Showing posts with label Thrifted DIY. Show all posts

Thursday, October 31, 2013

Thrifted DIY: A Halloween Ginger Spice Dress!

Materials Needed:
* Blue Dress
* Duck Tape
* Red and White Paint
* Paintbrush
* Something to put inside the dress so paint doesn't bleed through
 
 
Step One: Duck Tape the shape you want to paint inside of.
 
 
Step Two: Paint inside of the duck tape in the corresponding colors.
 
 
Step Three: Let paint dry overnight, leaving the tape in place.
 
 
Step Four: Take the tape off, and touch up any spots that need it. Let dry. Done!


 Check out my DIY'd Ginger Spice dress! :) Isn't it awesome? My co-workers and I are going to be the Spice Girls today for Halloween, and it'll be so cool!

I can't wait to show you guys the pictures tomorrow! :) Let's just say, I'm going to look a little different!

Always,
Amanda

Monday, October 21, 2013

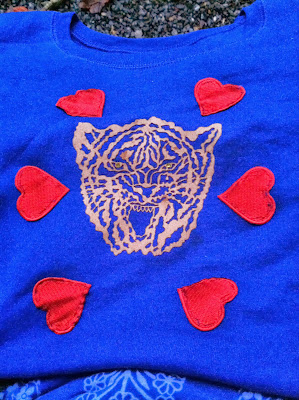
Thrifted DIY: Tiger Heart Sweatshirt!

Tiger Heart Sweatshirt: DIY

First off, yesterday's yard sale was an almost complete bust! Oh well- you win some, you lose some, right? We donated what didn't sell to Goodwill, so it's all good. :)
On a brighter note, here is my latest thrifted DIY: an awesome sweatshirt! I found the iron-on tiger on etsy for a couple bucks, the plain sweatshirt at Goodwill, and the heart patches for $2 at JoAnn's. So, it cost about $5 for this DIY.

It was a little time-consuming, due to the fact that I accidently got sew-on heart patches instead of iron-on, but at least they won't fall off!

I know the design is a little weird, but it's what I popped into my head when I saw the heart patches. :)

I hope everyone has a great Monday!

Always,
Amanda

PS: I'm still sick, but I'm starting to feel better!

Tuesday, April 2, 2013

Thrifted DIY: Chair Seat Re-Cover


This was a fun DIY- and so easy, too! This thrifted fabric was the perfect thing to perk up an old chair. :)


Always,
Amanda


Friday, March 22, 2013

Thrifted DIY: Spice Rack to Pretty Nail Polish Holder!

I thrifted a spice rack from the Goodwill bins for next to nothing to use as a nail polish holder. I promptly hung it up and filled it with nail polish, but it was definitely a bit sad looking. (See first photo below.) With a little $3 can of spray paint and a drop cloth, I gave this little guy a little love. :)

 Before:


 Step One: Gather supplies. (Spice rack, spray paint, drop cloth.)


Step Two: Put down drop cloth and spray paint the spice rack.


 Step Three: Let dry according to the spray paint instructions, and hang up. You're done!


Happy Friday!

Always,
Amanda

PS: Happy birthday to my awesome hubby, Josh. :)

Tuesday, February 26, 2013

Thrifted DIY: Dotted Jeans!


Step One: Gather supplies. I used two paint pens and a thrifted pair of jeans. (Make sure the paint pens are permanent on fabric.)

Step Two: Start dotting! I didn't use any specific method to get the dots spaced out- I just alternated each line so they weren't straight lines of dots. :)

Step Three: (Optional) Start using a slightly different color paint pen to create a graduated effect. I did white, then blue.

Step Four: Rock your awesome, newly dotted jeans!!!

That's it! Don't you love super-easy, cute DIYs? :)

Always,
Amanda

Tuesday, February 19, 2013

Thrifted DIY: Making a Fanny Pack Cute(ish) :)

I've decided that, for our trip to Ireland in May, I will wear fanny packs. But only cute ones. (Which, after lots of searching, I've discovered they either don't exist or are more than $40. No thanks.) I did find one leather one on etsy that's on the way to me, but here is the one I thrifted and DIYed. :)

Step One: Gather supplies. You'll need: Leather scrap or other thick material scrap, thrifted/old/not-cute fanny pack, tacky glue, and scissors.


Step Two: Cut out heart or other cute shape from your scrap material.


Step Three: Spread glue on the fanny pack where you'll be placing the shape, and also on the back of the shape.


Step Four: Press your shape onto the fanny pack. Some glue may seep out, but the tacky glue should dry clear. Wipe away excess glue if there are any large clumps.


Step Five: Let the glue dry for at least 30 minutes. You're done!


I also DIYed a simple money belt fanny pack I got for cheap at Joann's. You see that on Thursday, 'cause I definitely instagrammed my newly DIYed fanny packs together!

Always,
Amanda

Tuesday, January 15, 2013

Thrifted DIY: Kitty Pins :)

 
 Step One: Gather supplies. You'll need: felt/ wool/ leather/ etc. to cut the design out of; scissors; tacky glue; and a box of latching pins with a flat back to glue the design to. (I thrifted the thick felt, and it worked just as well as the leather.)


 Step Two: Cut out design. I traced on the back of the felt/leather and then cut it out.

 
Step Three: Glue your design to the pin. 

Step Four: Let your pin dry for at least 30 minutes before wearing it!


Above are some of the silly designs I made this weekend. :) I love the kitty ones the most, but I'm also pretty fond of the hearts and letter ones! Plus, the silly huge googly eye ones make me smile!

Always,
Amanda

Monday, October 29, 2012

Thrifty DIY: Googly Eye iPhone Case

Step One: Gather Supplies. Shown are: a Dollar Tree iPhone case and a $1 pack of self-adhesive googly eyes.

 Step Two: Start sticking those babies on! Remember to space them out and make the pattern interesting!

 Step Three: Keep sticking on the googly eyes. Spread them out, in case you run out of one kind and have to fill in with other googly eyes. (I, um, forgot this part.)

 Step Four: Fill in with smaller eyes, and then step back and admire your quirky handiwork!


I love my awesome, new Halloween-appropriate case! And the total cost was under $5! I'd say that was pretty thrifty, considering the inspiration for this DIY is $48 at Urban Outfitters. :)

Always,
Amanda

Friday, April 13, 2012

Thrifted DIY: Neonize It!

 
 It's official: I got bitten by the neon bug. It is sort of like my heart obsession- when I see something ordinary, I want to make it better by making it neon! 

These shoes were thrifted at Goodwill Outlet this past Saturday, and they served as a neonize-ing guinea pig. I simply painted on layers of bright orange acrylic paint with a sponge brush, and it worked out well...until I stubbed my toe and a chunk of paint came off! 

Lesson learned: make sure to seal the paint after it dries. Also: if you wear traffic-cone-orange-tipped shoes to work, people will notice.

Happy Friday!!
Always,
Amanda

Saturday, April 7, 2012

Detail Shot Saturday: Orange you Glad :)

Necklace: Thrifted/DIY
When I found these beads in the Goodwill Outlet bin a couple weeks ago, I couldn't resist them! Something about the color is super appealing... Maybe they remind me of Florida orange juice?

Anyway, I grabbed some thrifted leather cord and immediately made a necklace with them. :) Definitely my new fave!

Always,
Amanda

Saturday, March 24, 2012

Detail Shot Satuday: DIY Glitter Pin!

Glitter Cat Pin: DIY

I think this pin may be my favorite DIY idea ever! I've seen all sorts of glitter hair clips and headbands and the like, and I knew I could make a pin. :)

I got pre-glittered thick paper and sticker-backed pins, cut out shapes, and attached them to the pins! Super-duper easy, and very cute. :) My favorite is this cat-head one, but I can't wait to make more!!

Always,
Amanda

Tuesday, February 14, 2012

Happy Heart Day!

Happy Valentine's Day, everyone! I thought I'd look up some of my heart-themed finds and DIY's for the occasion. :)

Josh and I are cooking ourselves a meal at home tonight, complete with steak, twice-baked potatoes, salad, and chocolate strawberries! Yum! I'm getting hungry just thinking about it. :) Have a great day!!

Always,
Amanda

Thrifted DIY: Put a Heart on It 10/27/11
Thrift Finds: Purple and Red 11/2/11

Thrifted DIY: Easy Backpack Fix 11/17/11

Thrifted DIY: Put a Heart on It #2 1/27/12

Thrifted Vintage: Hearts and Flowers 2/10/12

Wednesday, February 1, 2012

Thrifted DIY: Glitter Bomb Shoes


This past weekend, I started brainstorming ideas for my thrifted Mod Podge and chunky gold glitter. The first thing I thought of was one of my favorite DIY blogs Stars for Streetlights! She was on a glitter kick a while back, and I knew I could use her tips to glitterfy some wingtips. :)

For this simple DIY, all you need is Mod Podge, chunky glitter, and a paintbrush. (Well, and something to glitterfy!)

1. Fill a throwaway container half-full with the Mod Podge and the rest of the way full with glitter.
2. Mix and paint the mixture where you'd like it. (I would advise doing this outdoors so that your apartment/house isn't filled with glitter and a lingering smell...)
3. Let dry for a couple of hours outside, and repeat process if it isn't glittery enough! 

Before:


After:


While I liked these oxfords before, I love them now! The glitter makes them just special enough to elevate any outfit. :)

Always,
Amanda

Friday, January 27, 2012

Thrifted DIY: Put a Heart on It #2

Heart Tote: DIY
I've been really wanting a heart tote since seeing this one from Fluffy Co. And although that one is still on my wish list, I decided I could make a similar one for a lot less! I used a tote I purchased for $3 and thrifted paint and paintbrushes. :)

Supplies: Acrylic paint; sponge brush; small paintbrush; Sharpie; large tote; heart-shaped chocolate box

How-to: 
  1. Trace the outline of a heart-shaped chocolate box onto a large tote with a black Sharpie.
  2. Squeeze paint inside the heart, and paint the inside with a sponge brush. 
  3. Paint around the edges of the heart with a small paintbrush.
  4. Dry in a kitty-free area.
  5. Use your thrifty tote as a cute purse alternative. :)
Perfect for Valentine's Day! Have a great weekend, everyone.

Always,
Amanda

Thursday, November 17, 2011

Thrifted DIY: Easy Backpack Fix

Backpack: Goodwill Outlet ($2); Floral Fabric: Estate Sale ($1)
This cute, roomy backpack was waiting in the Goodwill Outlet bins for me, probably because it had a company logo embroidered on it.

I saw it and immediately thought 'easy DIY!'. (I blame Pinterest for this recent DIY obsession...)

Thankfully, it was a super simple fix. Just some craft glue, scissors, and fabric...and it's as good as new! I think this pretty backpack will be going with me to Florida at Christmas. :) The padded straps will make it comfy to lug across a couple of airports!

Always,
Amanda

Friday, November 4, 2011

Thrifted DIY: Easy Tie Wreath

 Last weekend, I went on a bit of a DIY spree. Some things didn't turn out like I planned (dyed jeans), but a couple of them were great and easy!

This tie wreath DIY I saw while browsing the archives of A Beautiful Mess, and it looked doable. Here's the step-by-step:

Step 1: Gather supplies: foam circle, push pins, scissors, adorable ties.


Step 2: Cut the larger ends of ties off, making them long enough to layer. Pin them on as shown below, covering up the rough edges:


Step 3: Keep going around the circle until it's all covered. Pin the skinny end of a tie to the top as a hanger. You're done!!


Have a great Friday!

Always,
Amanda

Thursday, October 27, 2011

Thrifted DIY: Put a Heart on It :)

Thrifted Flats, Goodwill Outlet ($2)
I wasn't so great at taking step-by-step photos of this thrifted DIY! But it was super-duper easy. :)


I just cut a heart-shaped piece out of cardboard and traced the shape onto each shoe, then filled them in with pink paint. I love any DIY that is easy and fast!

I'm definitely of the mindset that putting a heart on something (anything, really) makes it better. :)

Always,
Amanda

Friday, October 14, 2011

Thrifted DIY: Golden Toms

My "before" Toms were super-comfy thrifted awesomeness. But they were green and blue dotted. No matter what I paired them with, they just didn't feel right. I'd been searching for gold ones for quite awhile, so it hit me...it was Thrifted DIY Time!!!!

1) Gather your Toms or other canvas shoes: 


2) Gather your supplies, ie: golden paint, sponge brushes:


 3) Start applying golden paint to shoes. With patterns, make sure you do multiple layers:


 4) Let your shoes dry for a couple of hours, and voila! New, golden kicks:


Have a great Friday!!!!

Always,
Amanda

Wednesday, August 10, 2011

Outfitted In: Floral, Fringe, and Tortie Cats!

Floral Shirt, Vest, Fringe Sandals, Bracelet: All Thrifted; Jeans, Burlington; Sunnies, eBay; Sprout Watch, KMart; Tortie Cat Printed Tote and Lapis Necklace, DIYed
This was my outfit for another lazy Sunday, spent estate sale hunting and movie watching with the hubby. :) Although I loved wearing my favorite fringe sandals, the star of this outfit was definitely my newly DIYed tortie cat printed bag!

It was just about the easiest project ever, too. :) I just made a cat head stamp based off Moxie cat's little head and big ears, and stamped all over the tote with black and brown paint. I went back over each cat head with more paint to make the print darker, and it was finished! Here's a close-up:


I hope you have a great Wednesday! Already halfway to the weekend, folks. :)

Always,
Amanda